


Disclaimer This section contains some maths. You can either read and understand this stuff; or you can go spend a load of money on a building tool like Skidz Primz which will do it all for you, but get frustrated at the lag and general silliness of SL and decide that building is not for you and give up. If you know the mechanics behind how to do this stuff, you can throw away the "tools" and work from first principles. Although it will be slower at first, you'll soon speed up and, crucially, learn to plan your builds and ultimately, you'll find it much more rewarding knowing the whole thing came from your own brainpower.
Planning the Build
If there's one thing I can't stress enough, it's plan the build, build the plan. Nothing will throw you off course quicker than not having a plan or not following your plan. If it's really not working that well, go back and revise your plan. Working to a plan is soooo much quicker than not.
What I tend to do is go in-world, have a quick play with a few concepts, then delete everything I've done (yes!) and pick up a blank sheet of paper. I might draw some pictures like these:


These are simple drawings of a shed that we'll build out through the remainder of this tutorial. They don't have to be accurate; we're not going for draughstman-quality blueprints here, just a rough guide to give us our starting point. We'll be scribbling further on these drawings as we go, so keep them handy. The shed will be 4m wide, by 8.5m long (see where the extra 0.5m comes from? It's the thickness of the two end walls! This point is important, as we will see later.) by 3m high with a 1.5m tall pitched roof (yeah; it's a tall shed.)
OK. We know what we're going to do, so let's start building!
Building the Plan
This tutorial isn't about telling you how to use the building tools; I'm assuming you know that by now. What it is about is modular building and techniques to make your building fast and productive.
Positioning and Offsets
You dashed off in-world to start building, didn't you? Tut tut tut! Don't be so hasty. Go back to those drawings again. Which bits can we build in a modular fashion? Well, let's assume we want a shed with two doors; so the front and back walls are the same. This means we can build the front and back walls the same, and simply position them when we build. Count up what we'll need; three prims for the front and rear of the shed, a prim for the roof and a prim for each of the side walls, and maybe we'll put a floor in; for a total of ten prims.
Let's label up these prims:
Picture
So; we'll build prim A first, a 3m x 1m x 0.25m box. Next to this we'll build B, a 0.5m x 1m x 0.25m box and then prim C, a 2.5m x 2m x 0.25m box. We'll leave D for later. Then we need to position them. This is where the maths bit comes in.
The Maths Bit
In Second Life, the position of an object is the centre (or center, if you're reading this in American) of the prim (or the collection of prims if multiple prims or a linkset are selected). So, it's these values we need to work with. Let's assume we're building in the XZ plane, and that all the prims of our front wall will have the exact same Y co-ordinate. So; all we have to do when we build is pick a Y value, and enter that into each of the three prims, A, B and C. Great.
But we still need to know how high up to put each prim and also how far along the X axis we need to go. Since we've picked A as our first prim; building it is easy; we can put it anywhere. But before you do that, give yourself a break; build it on a complete metre mark (e.g. 20m). That will make the maths a whole lot easier later on. Let's give Prim A co-ordinates <Xa, Ya, Za> and dimensions <Wa, Da, Ha> equal to <1, 3, 0.25> in this case.
To work out the co-ordinates for the next prim (Prim B), simply work out where in relation to the centre of the previous prim this prim's centre is. So, Prim B touches Prim A on it's left hand edge. Also, it's top edge is aligned with the top edge of Prim A.
The coordinates for Prim B are <Xa + 1/2Wa+ 1/2Wb, Ya, Za+1/2Ha - 1/2Hb>
That looks horrible, doesn't it? Well let's step through it…
The X co-ordinate of Prim B, Xb is equal to Xa plus half the width of A plus half the width of B.
The Y co-ordinate of Prim B is the same as Prim A (since they're both in the same plane)
The Z co-ordinate of Prim B, Zb is equal to Za plus half the height of A minus half the height of B.
Still confused? maybe a picture would help:
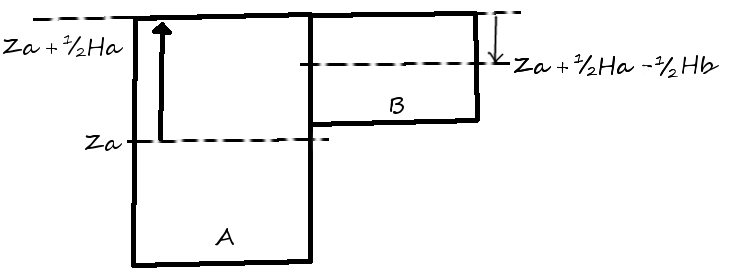
Start at Za, add half the height of Prim A to get to the top edge (to Za + 1/2Ha,) then subtract half the height of Prim B to find the centre poasition (to Za + 1/2Ha - 1/2Hb).
Let's plug some values in. Assuming A is at <10, 20, 30>, B will be at <10 + 0.5 + 0.5, 20, 30 + 1.5 - 0.25> or <11, 20, 31.75>. Try it in-world. But don't move the objects using the drag handles, type the calculated values into the position boxes in the build dialog (be careful not to mistype though or you may lose your object!).
You may have noticed that this is all based on half the dimension of the prim in the axis we are moving; and that sometimes we add and sometimes we subtract. Why? The answer is that when you want to abut two faces, you add values. When you want to align them along an edge, you subtract.


